Sunday, May 15, 2011

Blogger's Spring Quilt Festival

It's that time again...yeh! It's the Blogger's Spring Quilt Festival!! I personally love the opportunity to peruse the many blogs out there and see everyone's work, not to mention gaining inspiration for future projects! (like I need more of those:)

My submission for the Blogger's Quilt Festival is my Drunk Love Quilt that I made for my stepson. I had been promising him this quilt for some time so I was happy to complete it this February. It's already well loved as he sleeps with it under his duvet every night!

This work was a combination of blocks from my virtual quilting bee, Pieced Together II, and my own. I can't thank the women enough because all of their blocks were wonderfully made! As you know, the Drunk Love Quilt pattern is a Denyse Schmidt (my fav!) design - some of the blocks are taken right from her pattern and some of the blocks (near the end of my block making:) were improvisationally made.

I really learned a lot in making this quilt. In an earlier post, I summarized my "lessons" or "things to consider," but I think they're worth repeating here. I hope you find them helpful.

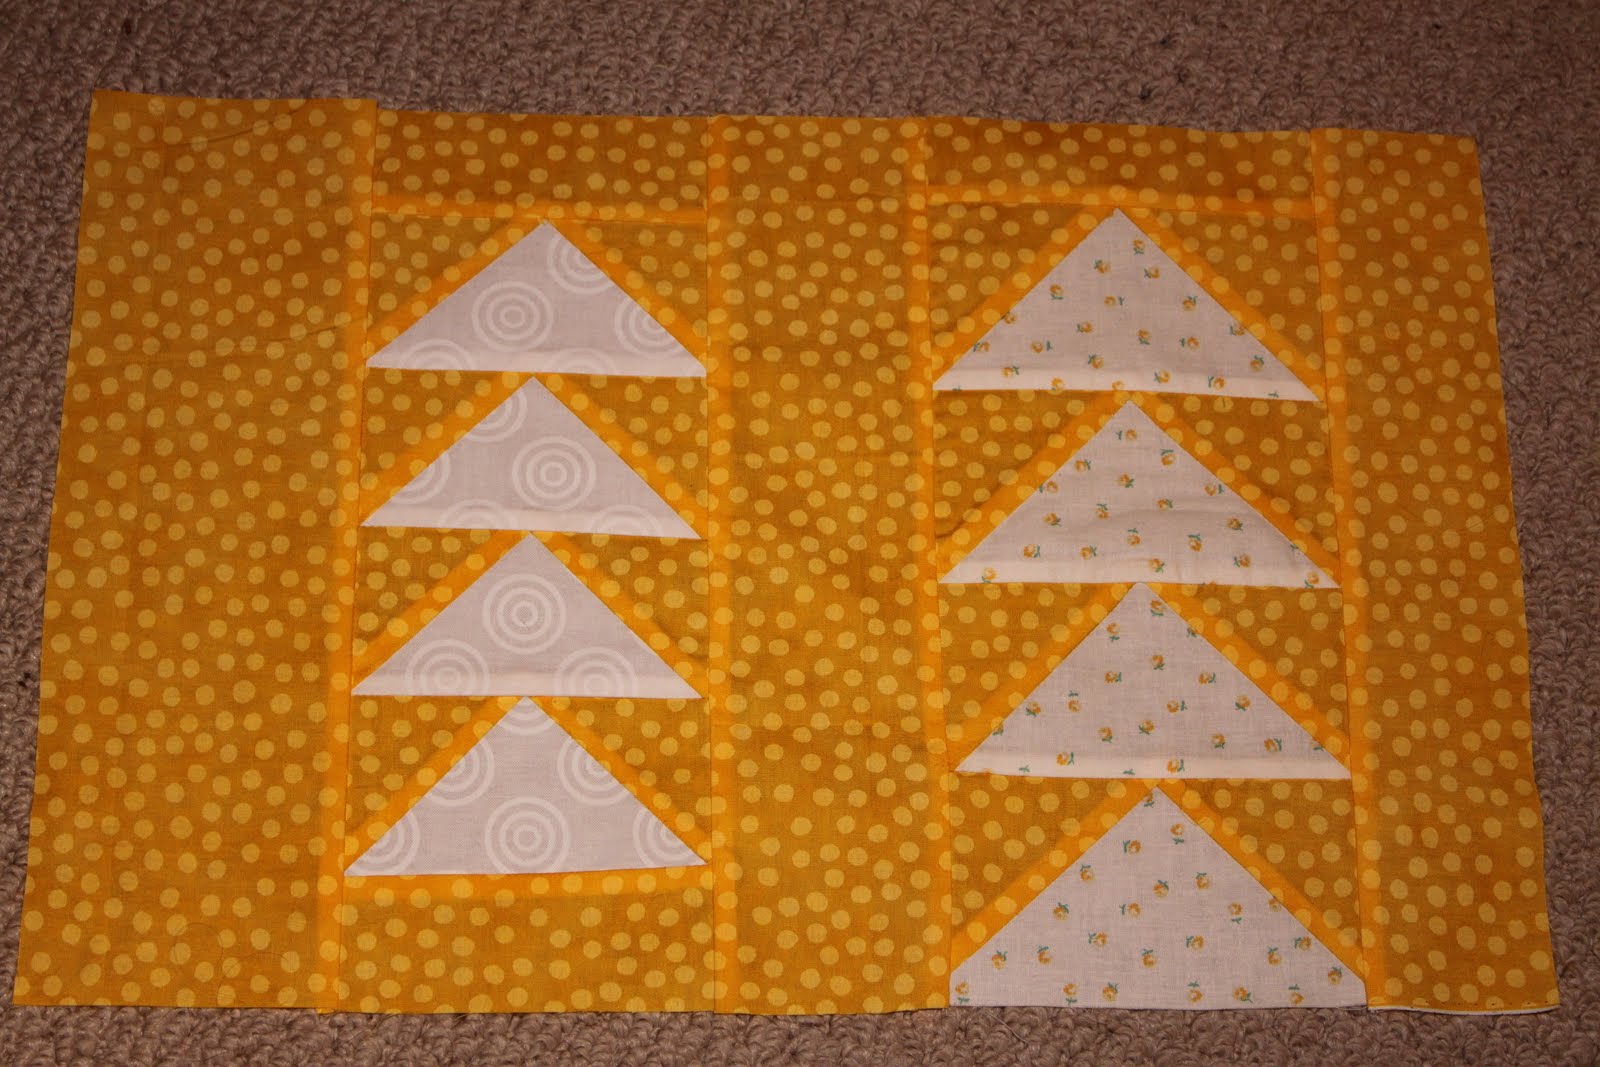
Concentric Square Quilting

I started off with quilting these squares working from the centre of the block and outwards. My biggest mistake was in not rolling my quilt tightly enough while quilting and maneuvering it. I found I was stuffing the quilt through the arm of my machine and it was take an excessive amount of time to quilt each block with all the twisting and turning - especially working from inside the square and outwards. What I realized after struggling with over half of my blocks in this manner was that if you rolled your quilt tightly it was a lot easier to pass it through the arm of the machine. Duh! It seems obvious but I think it's worth repeating for those of us out there who have done the same thing!
Once I started rolling it more tightly, it became a lot easier to quilt the actual blocks. The second thing I changed was that I began to quilt from the outside of the block and worked my way inward. I preferred this method much more as it was easier to maneuver around the block at first and you could envision your overall concentric square quilting (hope that makes sense). I found I started to not quilt as densely and left the centre block (especially if it was a big square) unquilted so that the pop of colour was left untouched and you didn't see a bunch of white thread. Again, just a matter of personal taste, not necessarily a right or wrong thing.

I wished that when I began quilting it I had left some of the centre blocks untouched. Having said that there are some blocks that I think really look cool from the back - ones that were densely quilted.

I also think it's important to consider what effect you're wanting to achieve in terms of the concentric square quilting. I decided not to free motion the squares and used my walking foot so that I could achieve a more straight line effect. One is not better than the other - again just a question of personal taste. Since I decided on straight quilting lines, I wish on some of my initial blocks that I quilted parallel to the seam lines. When I look at some of the first blocks I quilted, my eyes are distracted by the quilting instead of some of the last blocks I quilted.
Wow, I must sound really picky:) Don't get me wrong! These are just some of the things I felt that next time I wanted to think about first before I tackle concentric square quilting again. (I do have another drunk love quilt in the making...)

Machine Binding Tips

My two "go to" tutorials for bindings are CrazyMomQuilts and RedPepperQuilts
Rita at RedPepperQuilts actually talks about not only bindings, but tackling machine bindings. I too am not a fan of sewing anything by hand. That's probably taboo of me to say (haha) since I know a lot of you enjoy the process of sitting down and hand sewing a binding. I admire you! I have tried both methods of: 1. First attaching the binding to the back and machine stitching the binding to the front and 2. Attaching the binding to the front, pin the back and stitching in the ditch in the front (which attaches the binding to the back-Rita at RedPepperQuilts' method). I thought I would try Rita's method for this quilt and I love the result! I used my Accuquilt Go Fabric Cutter to cut out the 2.5 inch strips (my favourite is 2 1/4 strips but heh, I have the cutter and it's nice and convenient). Once I had my binding strips attached using Amanda's methodI then pressed them in half and using a 1/4 inch seam, attached the strips to the FRONT of my quilt. Once I ironed this, I then pinned the back so that the fold of the strip just barely overlapped the sewing line that you had just sewn. As Rita suggests, I then stitched in the ditch along the binding on the front. Now, I have to say there were definitely some spots that I didn't always catch by stitching in the ditch so I had to go back and attach....but that was just a matter of paying attention to how I pinned it. I found that at first I was folding back the binding to much and then once I stitched in the ditch, the sewing line was almost in the middle of my binding and not at the outside edge. I ripped this out, made sure that I didn't over fold my binding to the back and voila, a much better result!

The corner were sometimes tricky but I know that once I'm able to practice a bit more, they will become easier. The trick to corners are to pin, pin, pin.


Piecing the Back
Can anyone say....make sure your back is big enough before you pin and quilt! Sure, I know this is quilting 101, but I ignored that little voice inside my head that said, I think it might be a little too small and proceeded anyway! Ah...those voices are there for a reason aren't they!! haha While I didn't do this before on any of my other quilts, I did on this one - and let me tell you what a pain in the you know what it was to correct. I won't bore you any longer with this story...enough said:) I'm happy to say that after all of that correcting, the end result is still really nice and you can't tell as I simply added a few extra seams here and there of the same fabric so it's pretty continuous! Lucky!!

So, there you have it. Thanks for visiting - hope you come back soon!

Friday, May 13, 2011

Big Girl Room-It's a Start!

We've been working hard all week with all of the room changes in our house. My husband finished painting Miss G's room on Tuesday afternoon and her furniture arrived that same day. Miss G was so excited to say the least! We've been trying hard to "talk up" her "big girl room" because as most kids she was pretty attached to her old room (her little sister, Miss P has now moved into it). Even before we moved the furniture in her room that night, she had Miss P on her blanket reading her stories - it was very sweet!

I wanted her room to be bright and cheery so went with a purple, pink and lime green ("celadon" by Benjamin Moore") combination. I love her duvet...I love how modern it is and it pairs up so nicely (which was by accident) with her Hello Kitty sheets:) I bought the duvet at BouClair.

Miss G loves to colour and have tea parties so a trip to Ikea was in order for her new table and chairs (Kritter series).
Ikea also has great inexpensive curtains so I bought some white and green polka dot ones - I think they're so cute. We also have a spot to read to her as I included this little club chair (which used to be perfect for breast feeding by the way).

Here's a pic of my little Monkeys, husband included (haha) pretending to be asleep in the big girl bed!


We still have to put up Miss G's decorations on her walls and move in some of her toys (so we can get them out of "toy central" which used to be our living room!), but I wanted to show all of you what was happening so far...I'll take some more pics soon.

Winners

I think Blogger has been on the fritz this week because I did a posting about the winners of my Mother's Day contest and it since has been deleted. So, here goes again:

1. Amy Butler Daisy Chain fabric - TwinFibers who wrote: "I hope you had a great Mother's Day! :) Thanks for the giveaway! "

2. Amy Butler Martini Dots fabric - Stephanie who wrote: "Happy Mothers Day! And thanks for the giveaway :) "

3. MoMo Wonderland fabric - Alison who wrote: "Oh, I've always wanted some Wonderland. I've never seen it in person. I just had a baby in January and so Mothers Day was extra special this year. She is so precious! Thanks for the giveaway opportunity."

I'll email you ladies for your addresses....thanks again everyone for stopping by my blog and entering the giveaway!

Wednesday, May 11, 2011

Giveaway Winners

Sorry for the late posting, but I do have some winners!

Winner of the Amy Butler Daisy Chain fabric
TwinFibers,
"I hope you had a great Mother's Day! :) Thanks for the giveaway!"

Winner of the Amy Butler Martini Dots fabric
Stephanie,
"Happy Mothers Day! And thanks for the giveaway :) "

Winner of the MoMo Wonderland fabric
Alison
"Oh, I've always wanted some Wonderland. I've never seen it in person. I just had a baby in January and so Mothers Day was extra special this year. She is so precious! Thanks for the giveaway opportunity."

Ladies - please contact me with your addresses!!

Thanks everyone for stopping by and entering my giveaway!!

Sunday, May 8, 2011

A Little Mother's Day Giveaway!

Hope everyone is enjoying a wonderful Mother's Day! It's a beautiful sunny day here which is really nice for a change:)

As promised, I put together a little giveaway for 3 people. I have some Amy Butler fabric from her Daisy Chain and Midwest Modern lines.


I also have a little Momo Wonderland scrap pack - 8 charm squares and various scrap pieces. All you have to do is leave your contact info and I'll draw the winners on Tuesday May 10th at 8pm EST.

Thanks for stopping by!
Cheers!

Saturday, May 7, 2011

Knitting Needle Roll & Crochet Hook Roll

Knitting Needle Roll by BlueberryGabs
Knitting Needle Roll, a photo by BlueberryGabs on Flickr.

Remember this knitting needle roll I made a few years ago? It's now getting too stuffed with all of my needles so I made a matching crochet roll to go with it yesterday. It felt good to get a "to do" item off my list of things to finish, not to mention organizing all of my crochet hooks ( I still have to track them all down but I put a few in for the pic).


I used the following dimensions:

Exterior fabric, Lining & Fusible Fleece: 10x11
Pocket Lining: 6x11
Ties: 2x15
Fabric: Amy Butler Wallflowers and Moon Dots in Cherry
Seams: 1/4 inch (1/2 inch around the perimeter before turning inside out)

What I love about it is that it's cute and functional!

Friday, May 6, 2011

Flying Geese in a Rut:)

I worked on this block for Cheryl yesterday. It is severely late (hope she understands) but it's done!

She asked for either a 12.5, 12x18.5 or 18.5 block so I chose to do the 12x18.5 block. She sent a variety of yellow and white fabric. It's only my second time making flying geese so I chose this method (2nd one in the tutorial which yields 4 geese out of one square of fabric). I don't know what my problem was because it is an easy tutorial but I must admit I had to rip a couple seams out and redo a second time (I've since straightened that last triangle on the bottom left. I think it was just the day I was having:) I still need to complete Shea's block and then I'm caught up with bee blocks.

As you can tell from my lack of blogging, I haven't had many finishes lately. Amidst some worrying about family (but all is well now which I'm so happy to report), we're trying to transition my oldest daughter into her new room so the little one can move into her room. This has meant my stepson will be moving into our basement bedroom which he is thrilled about....talk about changing spaces!!! I've been busy planning and shopping. I can't wait to have it all finished and show you some pics. We're going to start painting hopefully this Sunday and her "big girl" furniture will arrive on Tuesday. She's pretty excited about it.

I just haven't had any sewing "mojo" lately but believe me I have a lot of finishes to complete...not to mention all of the knitting I need to do. I'd like to get my Single Girl Quilt done so I can add it to Miss G's new room. I also want to make a little crochet hook/needle roll because with all of these room changes I needed to move/organize my fabric and yarn stash - so now I'm on an organizing kick!

For Mother's Day, my husband bought me a beautiful, Namaste Monroe bag in Lime, a circular needle case and a needle case (small and large cozy)....Yeh! I can't wait for them to arrive. I thought the Lime would be a nice color boost!! I'll post a pic when they get here!

Can I just say a BIG THANK YOU to all of my readers (all 57 of you) for stopping by my little corner of the world and saying hi!!! I've just reached over 10000 hits and I must say it feels really nice. I came across Flickr and all of the various blogs back in 2008 when I was off on mat leave with my first daughter. It introduced me to a whole new world which has left me incredibly inspired. I only have one local friend who shares my interest in modern sewing and knitting so it's really great to have all of you out there to share ideas, projects, etc. So, thank you! I'd like to have a little Mother's Day weekend giveaway so stay tuned.

Oh yeah, I want to share something cute that Miss G said to me as I was driving her to day care this morning. I was singing Lady Gaga's Pokerface song...and she says, "Mommy, you can just "hum" you know"(she didn't say the word but hummed). I don't think she likes my singing:( I had a good laugh!!!

I'll leave you now with a pic I took last night of Miss P...those beautiful blue eyes...make me melt every time.